Behind the Camera: Dan Avila’s Favorite Travel Shots
Multi-award-winning photographer Dan Avila shares how he shot and edited five standout travel photos.
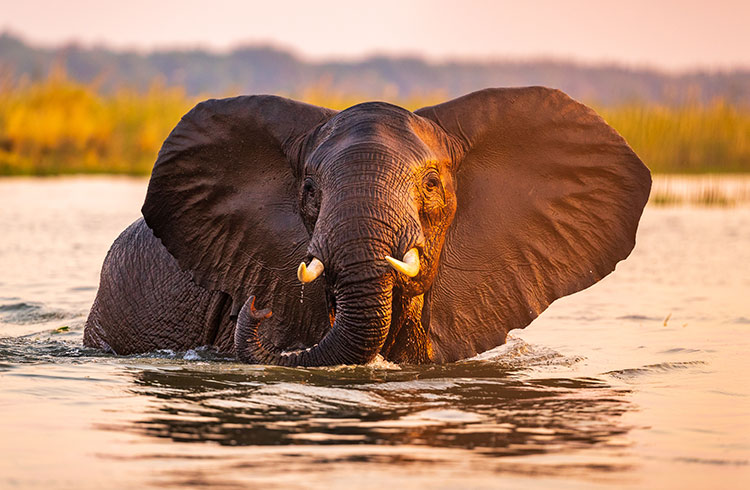 Photo © Dan Avila
- Elephant joy in Zambia
- Bison in Yellowstone
- Ice caves of Svalbard
- Colorado trainyard
- Antarctica's stowaways
Elephant joy in Zambia
I thought to myself, “This is it; you could actually die today.” I was in a canoe, just starting to navigate a seven-mile (12-km) section of the lower Zambezi River in Zambia. The first bull hippo charge caused me to contemplate my mortality, but he was only one of dozens of hippos encountered on that trip, causing my adrenalin to pump so hard I could feel my eyeballs throbbing.
It’s a strange feeling, yet I think this hyperaware state made me a better photographer on the day.
At the end of the hippo-canoe trip, this elephant and his pals ran into the water, sending the hippos into a quick retreat. As soon as he emerged from the water, his drab grey skin become wonderfully reflective of the late afternoon sun. I knew the shot I wanted – a direct stare, with the sun on his side. I positioned myself perpendicular to the sun, ready to shoot him head on and prepared the camera with the right settings for the situation. After a swim with his buddies, I got the stare, with the ears out, in perfect light. I love this shot because it reminds me of the pure fun this guy and his pals were having in that hippo-filled river.
Camera gear
Camera: Canon 1DX Mark II DSLR body.
Lens: Canon 200-400mm f/4 L with its in-built tele-extender that increases its reach to 520mm without any loss in sharpness. It’s a heavy setup but allows me to fill the frame with the subject.
Settings
- Aperture f/4 – the widest aperture available. It allowed me to blur out the background, isolating the subject. It also provides the greatest amount of light to hit the sensor allowing for faster shutter speeds
- Shutter 1/640th of a second – certainly fast enough for this slow-moving guy, ensuring a super-sharp result.
- Focal length 340mm – mid-range on the zoom
- ISO 1000 which is quite high, necessary because of diminishing daylight and well within acceptable noise parameters for this camera
- Shot in RAW (always)
Editing
This was shot so late in the day, that there was no harsh contrast to contend with. I processed the RAW image in Adobe Lightroom.
- I reduced the brightness in the sky
- I globally warmed up the image to enhance the sunset feel
- I used a brush to selectively process the elephant, keeping the shadows dark but balanced, and enhancing the clarity, sharpness and texture of the skin.
Bison in Yellowstone
Yellowstone National Park in winter is a Narnian wonderland. In the warmer months, millions of people descend on the park, but in mid-winter, there are no crowds in this phenomenal landscape, which provides incredible photo opportunities.
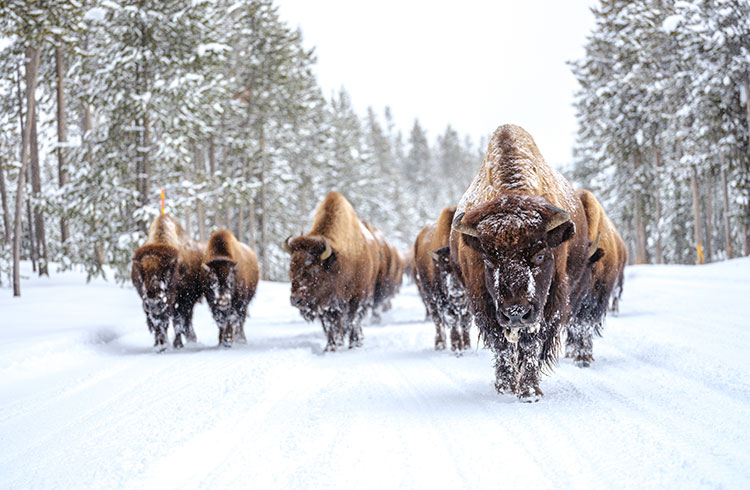
The American Plains Bison is a fascinating photographic subject and easy to locate with a guide. Setting out in a specialist snow truck, with temperatures hovering around -4°F (-20°C), I knew the exact bison image I wanted to capture. It had to be head-on and shot from a low angle to capture the power and shape of this prehistoric beast.
We approached this small herd making a fast march on a snowy track and put the plan into action. Our guide pulled out about 500ft (150m) in front and my wife, Zora, and I jumped out and took a position in their direct path. I shot from a kneeling position – a little below snout height, to really capture their oversized necks. The big bull led the pack and didn’t slow or deviate at all. As I fired off the final shot, Zora dragged me up by the shoulder into the truck just in time, as the bison passed by in all their snow-covered glory.
Camera gear
Camera: I shot this on a Fujifilm GFX50S medium-format, mirrorless camera. Medium format is a slower shooting option compared with DSLR, but the image quality, resolution and dynamic range are breathtaking.
Lens: Fujifilm GF 120mm Macro R LM OIS WR. In hindsight, a longer lens would have been a safer alternative, but this focal length allows for some nice compression and subtle isolation of the dominant bull.
Settings
- Aperture f/4 – the widest aperture available
- Shutter 1/160th of a second – barely fast enough and really should be at least 1/400th for moving animals
- Focal length 120mm
- ISO 320
- Shot in RAW (always)
Editing
I processed the RAW image in Adobe Lightroom.
- I set black and white points for maximum contrast
- I manually adjusted the white balance, using the black areas as a reference
- I painted on exposure in dark areas and selectively reduced highlights in overexposed zones
- I increased sharpness, clarity, dehaze and contrast to bring out the details of the ice.
Ice caves of Svalbard
Taking adventure photos just isn’t the same when the process is too easy, so nailing the shot in a pitch-black, high-arctic glacial ice cave is super satisfying.
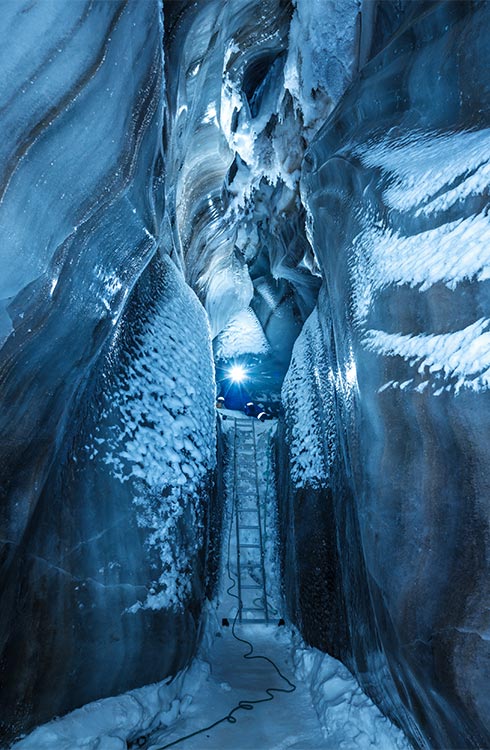
Getting to the ice cave on this Norwegian archipelago is half the fun. We ventured out into the great white wilderness on a dog sled with an armed guide – this is polar bear country. Cave access is via a small opening where we unceremoniously reversed through an inconspicuous entry before the caverns of silky smooth ice layers became illuminated by our headlamps. With our headlamps off, the inky darkness is so absolute, it feels heavy.
Using my widest lens on a medium-format camera, I framed the shot on a sturdy tripod and preset focus. Zora sat completely still on the ledge and focused her headlamp directly toward the camera. I set the shutter release for a two-second delay to ensure I would not cause any camera shake by hand. As soon as I heard the beep indicating the 10-second exposure had started, I used my headlamp to paint all the surfaces of the cave with light, never holding still on a single spot, trying to be as even as possible. While painting, reflected light is accumulating on the sensor, building the image. The final reveal is incredible – capturing the magic of a small space in this 1,000-year-old permafrost.
Camera gear
Camera: Fujifilm GFX50S medium-format, mirrorless camera
Lens: Fujifilm GF 23mm f/4 R LM WR
Settings
- Aperture f/8 – the sharpest setting with good depth of field.
- Shutter 10 seconds
- Focal length 23mm which is approximately 16mm equivalent on a full-frame DSLR
- ISO 400
- Shot in RAW (always)
Editing
I processed the RAW image in Adobe Lightroom.
- I set black and white points for maximum contrast
- I manually adjusted the white balance using the black areas as a reference
- I painted on exposure in dark areas and selectively reduced highlights in over-exposed zones
- I increased sharpness, clarity, dehaze and contrast to bring out the details of the ice.
Colorado trainyard
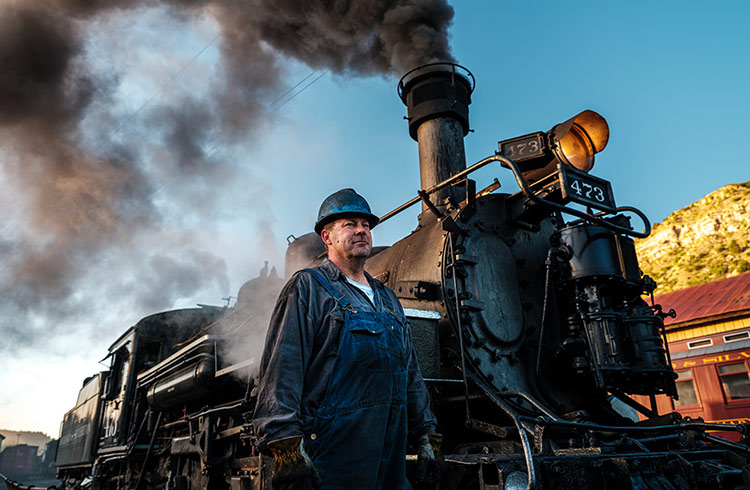
Colorado has a proud American history. As part of a 10-day shoot across the state, we had the chance to capture its Native American, Western, and industrial heritage. Steam locomotives and the people who still work with them, embody the pure grit and endurance of the American pioneers, so when we were granted access to the Durango trainyard, we knew we were in for some amazing photo opportunities. With perfect blue skies, a fired-up locomotive and a willing engineer caked in coal, I got this shot of a proud man and his machine.
My approach was to capture strength and pride. I used a wide-angle lens from a low position to shoot up at the subject – directing him to face down the line, in the same direction as the train. As the coalsmoke billowed, it framed the shot nicely and added impact to the image.
Camera gear
Camera: Fujifilm GFX100 medium-format, 102-megapixel mirrorless camera
Lens: Fujifilm GF 32-64mm f/4 R LM WR
Settings
- Aperture f/4.5
- Shutter 1/100th
- Focal length 32mm which is approximately 23mm equivalent on a full-frame DSLR – point of focus is the engineer
- ISO 250
- Shot in RAW (always)
Editing
I processed the RAW image in Adobe Lightroom.
- I set black and white points for maximum contrast, and then boosted contrast, clarity and texture to achieve a gritty finish
- I manually adjusted white balance and colors to achieve a chromic, industrial color palette
- I used an adjustment brush to paint on some extra brightness, sharpness and clarity on the engineer. The image had enough range in the RAW file to achieve a similar outcome to using a strobe light on the subject.
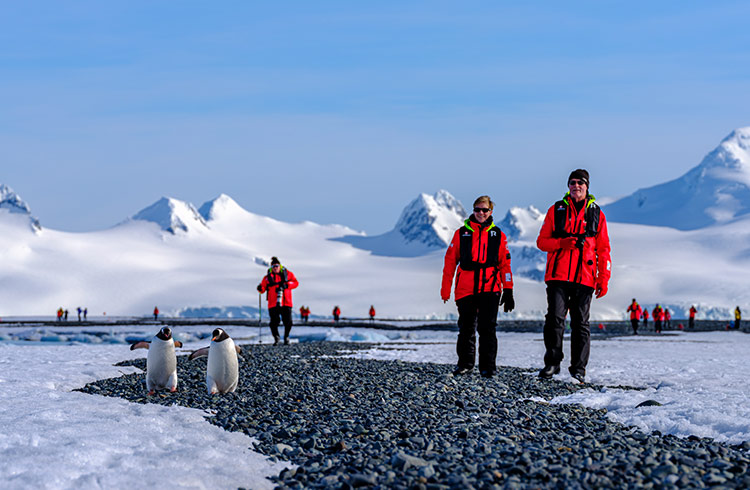
Antarctica's stowaways
Antarctica is completely astounding and defies expectations. When the sun sits low on the horizon and the wind drops, there is nowhere on earth with more interesting light and with wildlife so ambivalent or curious about human explorers. It is a photographic wonderland.
This shot was taken in Yankee Harbour, off the Antarctic Peninsula. Expeditioners in bright red jackets were returning from a visit to a gentoo penguin colony to the landing zone. The pair of Gentoos in this image filed onto the path and joined the explorers, doing their best to remain inconspicuous, as if planning a stowaway.
When I noticed this happening, I got into position to capture this pair in context with the human visitors. I used a medium telephoto lens to compress the scene and shot from my knees at penguin height. The position of the sun was almost directly to my right, meaning that the polarizing filter on my lens cut out all glare, providing amazing clarity in this capture.
Camera gear
Camera: Fujifilm GFX100 medium-format, 102-megapixel mirrorless camera
Lens: Fujifilm GF 120mm Macro R LM OIS WR with a circular polarizing filter
Settings
- Aperture f/6.4
- Shutter 1/250th of a second
- Focal length 120mm which is approximately 85mm equivalent on a full-frame DSLR – point of focus is the lead penguin
- ISO 100 (base ISO)
- Shot in RAW (always)
Editing
I processed the RAW image in Adobe Lightroom.
- I did very little to this RAW file
- I set black and white points for appropriate contrast, then reduced highlights to bring back detail in the snow and ice.
Related articles
Simple and flexible travel insurance
You can buy at home or while traveling, and claim online from anywhere in the world. With 150+ adventure activities covered and 24/7 emergency assistance.
Get a quote
No Comments